Dataset Curation
The process of of extracting labeled dataset for downstream analysis includes co-localization of the MSI data and reference image (histopathology), selection of spectra in regions of interest (ROI) in different classes, and saving spectrum-label pairs as a CSV file. The tab Dataset generation is designed for this task
Co-localization
In ‘Co-localization’ section, click on the ‘Landmark Registration’to switch to the Landmark Registration module in 3D Slicer.
In the pop-up dialog box, designate an MSI visualization as the Fixed Volume, and the pathology image as the Moving Volume, and then click Apply.
Tip
Use an MSI visualization that highlights spatial landmarks, such as tissue boundaries or tears, to facilitate co-localization and enhance its accuracy. The global-contrast PCA is one recommendation.
On the left side menu under Visualization, click on Axial and then Fit button to see the MSI visualization, pathology image, and the overlay of co-localized pathology on MSI side-by-side.
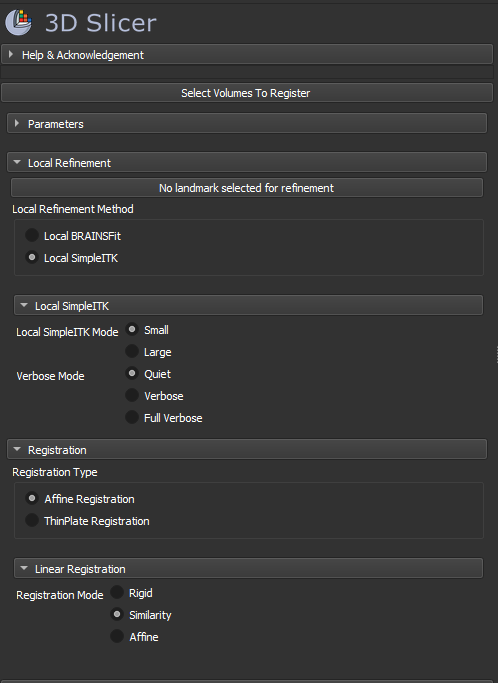
Set the registration parameters for translation-rotation transformation by selecting Affine Registration as the Registration Type, and Similarity as the Registration Mode.
Now that the parameters are set, you have to select landmark pairs on MSI and pathology images. Click Add under Landmarks to add your first fiducial.
After selecting a landmark on the MSI image, a corresponding dot will appear on the histopathology image. Drag the landmark on both images to point to the same physical location. If necessary, re-fit the images to the viewers by clicking on Fit button.
Continue this process for 3-4 landmarks to ensure proper alignment and registration of the images.
Upon completion, navigate to the overlay view and select the maximize view button to see the result in full screen.
Return to the MassVision module by clicking green back arrow in the toolbar. Alternatively, you can switch between modules by clicking the magnifying glass in the toolbar beside ‘Modules’ and searching for your desired module.
Note
This guide only covered translation-rotation transformation as a co-localization approach. For more information about registration parameters and other available approaches, please visit: https://www.slicer.org/wiki/Documentation/Nightly/Modules/LandmarkRegistration
ROI Selection

In the Dataset Generation tab in ROI selection section, you can select two visualizations; one as the Main reference and the other as the Guide for your ROI selection.
Important
The main visualization should always be an MSI visualization, and the guide can be either an MSI visualization or the co-localized pathology image.
Click on ‘Segment editor’ to go to the Segment Editor module in 2D Slicer. You’ll see the two chosen images displayed side-by-side and spatially linked, meaning changing the view on one window will change the view on the other one accordingly.
click on Add to add a segment. Each segment will count as a separate class label for your dataset. Users have the option to modify the name and the color of the segments by clicking on them in the segment list.
Important
The segment name serves as the class label. Therefore, when running a multi-slide study, it is essential to maintain consistent name labels for the segments across all slides.
You have different options to add regions to your label list. The simplest is to use the Paint and Eraser which can be activated by selecting
 and
and  respectively. You can add as many ROIs as needed per segment. The spectrum from any selected pixel will be included with the label determined in the segment name.
You can add as many labels as you want. Each segment can be modified by activating it (selecting the segment from the list).
Once you’re satisfied with your segments and ROIs, click the green back arrow in the top toolbar to go back to MassVision module.
Within the ‘Dataset Generation’ tab under “Export dataset” select Create CSV. You will be prompted to enter a file name and location on your local computer.
The images of ROIs will also be saved in the same folder path.
Note
This guide only covered the paint-erase segmentation for ROI selection. For more information about other available manual and automated segmentation approaches, please visit: https://slicer.readthedocs.io/en/latest/user_guide/modules/segmenteditor.html#
Saving Your Project
To save your project, click on Save ROIs and visualizations under “Save Project” section. You will be prompted to enter a file name and location on your local computer.Your 3D Slicer scene including all visualizations, registrations, and segmentations, will be saved as a mrb file and can be loaded later to apply modifications to the ROIs
Important
The project save function will not re-save the original MSI data. You need to reload the the data after loading the project to be able to continue the analysis.
Tip
When saving your project, make sure the file name is not too long, as long mrb file names will generate an error and may not save properly.